Connect bank and credit card accounts to QuickBooks Online
by Intuit•2280• Updated 4 days ago
Learn how to connect your bank and credit card accounts to QuickBooks Online.
When you connect your online bank in QuickBooks, the transactions automatically download and categorize. This helps you keep your bank feeds up to date. All you have to do is to review and approve them.
 If you need help with transactions, you can partner with QuickBooks Live Experts and feel more confident. Find out more about QuickBooks Live Bookkeeping.
For a better experience, open this article in QuickBooks Online. Launch side-by-side view ![]()
If you used bank feeds in QuickBooks Desktop, you'll need to connect your bank/credit card accounts again in QuickBooks Online for security reasons. If you plan to import your data from Desktop, follow these steps before you connect your bank:
- Find your most recently categorized transaction in QuickBooks Desktop.
- Make a note of the transaction date.
- Follow these steps to import your Desktop data. Note: It's important to do this before you connect your bank. Otherwise, your Desktop data will replace any downloaded bank transactions in QuickBooks Online.
- Your categorized transactions will copy from Desktop to Online. Uncategorized transactions won't copy over.
- To connect your bank to QuickBooks Online, continue reading this article. To avoid adding duplicate transactions, make sure to only pull transactions after the date in Step 2. You can do this by changing the transaction pull date while you're connecting your bank:
If you miss that step and download duplicate transactions by mistake, don't worry. You can exclude them from your books during the review process.
To compare how bank feeds work in QuickBooks Online versus Desktop, open this onboarding guide. Then, go to Part 10: Online banking. You can also find out more about how features and data move to QuickBooks Online.
Get personalized help connecting your accounts with QuickBooks Live.
To watch more how-to videos, visit our video section.
Connect a bank or credit card account
Connect your bank or credit card account so you don’t have to manually enter your transactions. You can also connect multiple businesses and personal bank accounts to keep your business information up to date in QuickBooks.
You can connect as many bank accounts or credit cards as you need.
Note: If you have an American Express Business account, it can’t be connected to your QuickBooks Online account this way.
- Go to Transactions, then select Bank transactions (Take me there).
- Select Link Account.
- Search for your bank by URL or name, or select a bank from the list..
Note: If you can’t find your bank, you can manually upload transactions instead. - Select Continue.
- Sign in to your bank account in the pop-up window.
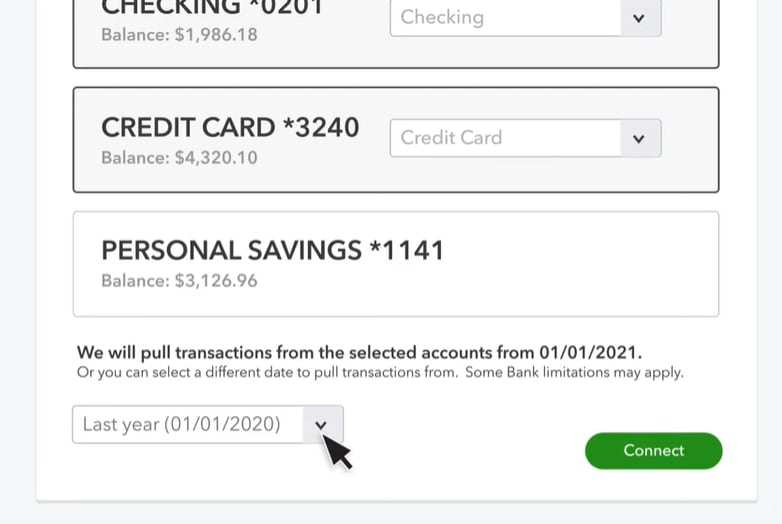
- Select the account that you want to connect to and the dates to pull transactions from the dropdown ▼. Then, select Next.
Note: Some banks let you download the last 90 days of transactions. Others can go back as far as 24 months. - Select the account type that matches your chart of accounts in QuickBooks from the Account type ▼ dropdown. Then select Next.
- In the Account Type ▼ dropdown, select either Bank or Credit Card. If you selected Bank Account, in Detail Type, select Savings or Checking.
- Name the account and select Save and Close.
- Map the bank account in the Existing accounts ▼ dropdown, then select Next.
- Select Connect, then select Done.
- Back on the Bank Transactions screen, select Update. This automatically downloads your recent bank transactions.
Note: You can edit the account name in the New account name field or change it later.
If you have already linked your bank account and want to add more from that institution:
- Go to Transactions, then select Bank transactions (Take me there).
- In the Link account ▼ dropdown, select Manage connections.
- Turn on each additional account you want to connect to.
- Select Enable now.
- In the Account Type ▼ dropdown, select either Bank or Credit Card. If you selected Bank Account, in Detail Type, select Savings or Checking.
- Select the dates to pull transactions from the dropdown ▼.
- Select Connect.
- Select Done.
You can disconnect an account or credit card to stop importing transactions from it. However, this won’t remove any existing imported transactions from your records.
- Go to Transactions, then select Bank transactions (Take me there).
- In the Link account ▼ dropdown, select Manage connections.
- Turn off the account you want to delete.
- Select Disable now.
Next steps
Review and make the downloaded bank transactions have been correctly categorized to keep your charts of accounts accurate.
Related links
You must sign in to vote.
Sign in now for personalized help
See articles customized for your product and join our large community of QuickBooks users.
Find the right fit for your business
![[object Object]](https://digitalasset.intuit.com/content/dam/intuit/sbsegcs/en_us/quickbooks-online/images/SDR-qbo-rightrail.png)
Choose from plans and features to fit your business needs with QuickBooks Online.
More like this
- Connect bank and credit card accounts to QuickBooks Self-Employedby QuickBooks
- Download the most recent bank and credit card transactions in QuickBooks Onlineby QuickBooks
- Connect bank and credit card accounts to QuickBooks Self-Employedby QuickBooks
- Find your bank or credit card account when you connect to online banking in QuickBooks Online or Self-Employedby QuickBooks