ACH Direct Complete User Guide
Complete User Guide Sections
1.1 Overview of ACH Direct
ACH Direct is comprised of five main functional modules allowing real-time interaction with KeyBank’s ACH system. The modules include:
- Corporate Administrator – The Corporate Administrator has the ability to view and manage users’ notifications/alerts on ACH Direct for their organization. This role offers report access to an audit log outlining what users performed what action in ACH Direct. The Corporate Administrator cannot add new users or remove users from this portal, only view. Requests for users to be added or removed from ACH Direct must be requested through your Payment Advisor.
- Online Control Totals – ACH Originators may manage file control totals online, allowing you the capability to add, view, modify or delete totals for originated files. Control Totals on ACH Direct also display the status of the file indicated by ‘matched’ or ‘unmatched’ to the ACH File transmitted. In addition, email notifications provide ACH Originators updates during file arrival and collection.
- ACH Debit Protection through Electronic Payment Authorization (EPA) – Protect your account against electronic debit fraud by using our EPA service. EPA allows you to exercise more control over which entries are allowed to post to your accounts by limiting the transactions to only those that have been authorized. Choose to block all debit activity or establish and maintain authorization records to allow certain trading partners to debit your account. Dual verification is available to ensure both parties are in full agreement with the disposition of an item before it can be approved and released from the dual verification queue.
- File/Transaction Inquiry – Through the Warehouse feature, you may view the detail of your ACH Origination files or query details of your received ACH transactions. File/Transaction Inquiry provides up to 60 days of historical ACH items received on a specified account or originated from a specified account.
- File/Transaction Inquiry with Deletes and Reversal – Through the warehouse feature, any item originated by your organization can be requested to be reversed or deleted. Delete requests can only be submitted if the original item has not been released into the network. Reversals are permitted within 5 banking days of the original effective date.
ACH Direct Email Notifications
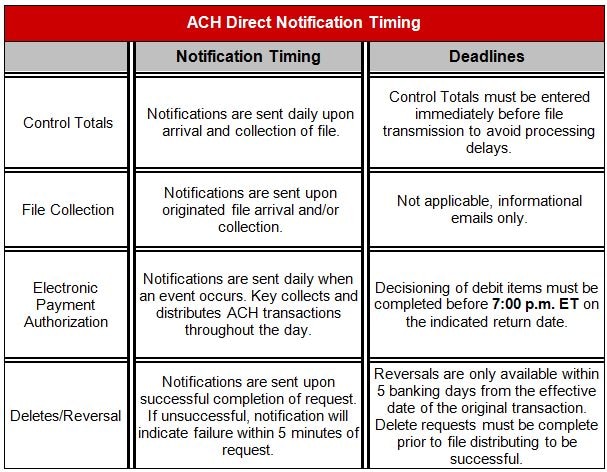
One of the best features of ACH Direct is the ability to enable notifications related to Control Totals, EPA/ACH Debit Block, file management and deletes/reversal requests. You may elect to receive event based email notifications; each notification type is assigned a number making it easy for you to identify the type of notification and any action required. All available email notifications will be enabled at time of set-up as a default.
Timing of Notifications and System Availability
ACH Direct Availability Schedule ACH Direct is available 24 hours a day / 7 days a week and only temporarily unavailable during system maintenance.
1.2 Getting Started on ACH Direct
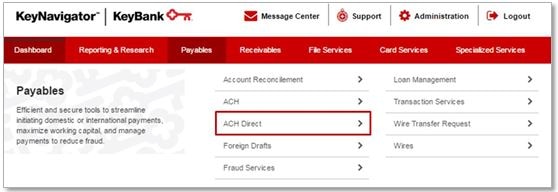
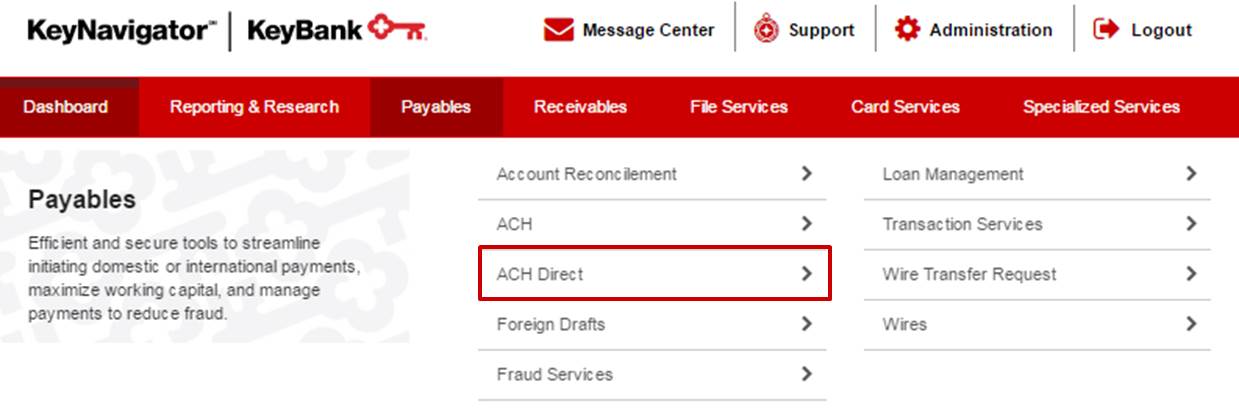
Your KeyNavigator® sign-on provides your access to ACH Direct from the Payables tab as outlined below. Select Payables, then click on ACH Direct.
Implementation Expectations
Signing on to ACH Direct via KeyNavigator for the First Time
Once you have received your KeyNavigator log-in information and services have been enabled, it is recommended you complete the following steps the first time you log into ACH Direct via KeyNavigator.
NOTE: For new users to EPA/ACH Debit Protection, services will not be turned on until you respond to ACH Operations with a start date. Once ACH Direct is enabled, you will automatically be able to enter ACH Direct from the payables tab.
Entering ACH Direct
- From the Corporate tab of www.key.com, log into KeyNavigator.
- Choose the Payables section of KeyNavigator and select ACH Direct. On the next screen select Enter ACH Direct.
- The ACH Direct main menu will display. From the ACH Direct main menu please be aware of the Alerts and Information box which will provide you with important information on upcoming events, scheduled outages, holidays and ACH processing details. Choose your desired action from the available menu.

Tips for ACH Direct
ACH Direct is optimized for Internet Explorer (IE) 9 but IE8 and IE10 are allowed. IE6 and previous versions will be blocked from use. Additionally, Firefox 27 and Chrome 33 are allowed. Depending on browser type and version, scrolling on Warehouse Detail Inquiry screens is normal.
Do not use the BACK button on your browser; instead navigate using the links contained within the ACH Direct pages.
To reduce the potential for missing a required action, users should log into ACH Direct on a daily basis to ensure all needed actions are performed.
An ACH Direct Corporate Administrator role can be designated to facilitate limited self service capabilities which previously required you to contact Key.
This capability allows you, as the Corporate Administrator, to make immediate profile changes to your users to ensure up-to-date access is maintained in ACH Direct for the security of your organization.
The Corporate Administrator role also provides access to a user audit log. The audit log will provide the administrator details by user and all activity they performed.
You can have more than one administrator role assigned. Key recommends that you have at least two Corporate Administrators assigned to ensure uninterrupted coverage when changes are needed. Additionally, the Corporate Administrator role can be established with dual control, whereby the changes to user profiles require a second administrator approval.
Key will continue to provide this service as needed and changes to users can be requested through your Payments Advisor.
2.1 Viewing and Modifying All Corporate Users
- From the ACH Direct Main Menu, click Corporate Administration followed by Corporate User.
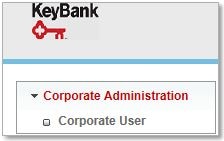
- This will provide you a listing of all users within your organization. Users not listed, or users who are listed and need to be removed, will require your company contact to make the official request through your Payments Advisor.
- Once users are displayed, locate the user to be modified. This can easily be done by using the magnifying search function located on the bottom of the user listings.

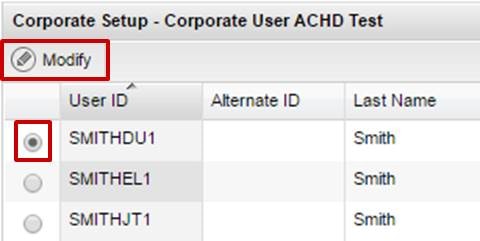
- To view a user, select the radio button to the left and hit Modify on the top toolbar.
- This will open the User Information box, displaying data related to that particular user. Some data cannot be edited and will appear ghosted in that field. Any changes to these fields will need to be arranged through your Treasury Services Payments Advisor. Other fields can be edited. Changes will be made immediately.
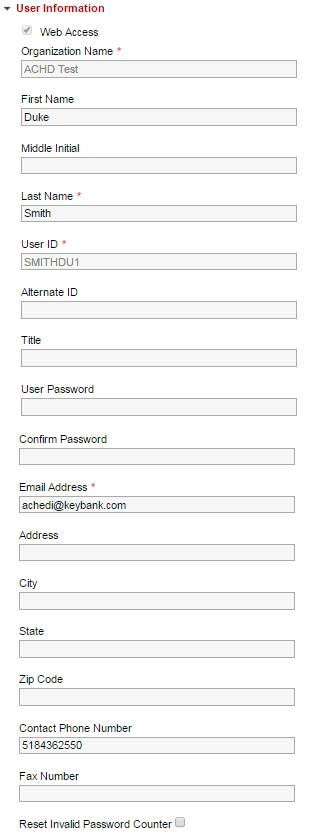
- Once you have modified the fields, select Save to ensure user’s information is updated.

Assigning Groups
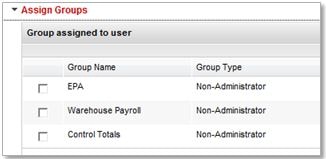
As a Corporate Administrator, you can View what groups a user is assigned to and request roles to be added or removed as needed through your Payments Advisor.
On the User Profile, click on Assign Groups. This will display the access currently in place for the selected user.
2.3 Notifications
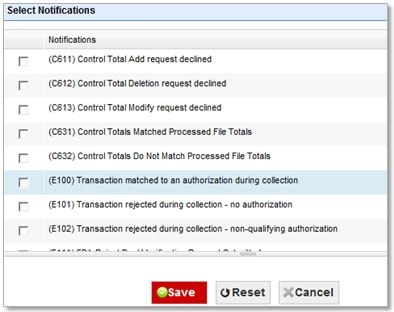
ACH Direct offers a variety of email notifications to users. As a Corporate Administrator, you can add or remove email notifications per user.
- On the User Profile, click the Notifications and select Add or Remove.
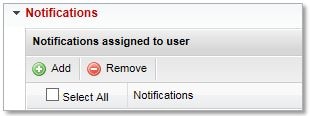
- This will display a selection of notifications that can be added or removed as appropriate for that user. Once your selection has been made, select Save to update notifications for the selected user.
2.4 Reports
As a Corporate Administrator, ACH Direct brings you the ability to view audit activity for all users assigned to your organization.
- In the top, left section of the home page in ACH Direct, select the Reports dropdown and click on Audit Activity.

- The screen will appear for you to select a specific user or all users. Enter the date or range of dates you are interested in viewing.
- Select the report type, sort fields and sort order. Once all selections have been made, select View Report.
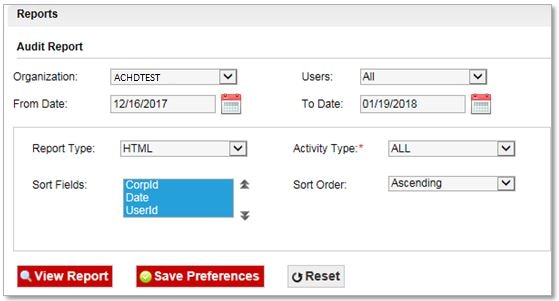
- This will display an audit report of the user’s activity for the date range selected.

3.1 File Collection Alerts
For ACH Originators, you can elect to receive real time email alerts regarding your ACH Origination files. Events such as Key’s receipt and processing of an ACH Origination file will trigger emails to those designated.
NOTE: You can also inquire on the status of your file through the File/Transaction Inquiry module within ACH Direct. Please see the document “ACH Direct – Transaction and File Inquiry” for instructions on how to view this information. If you are unsure of whether you have access to the File/Transaction Inquiry module, please contact your Treasury Service Payments Advisor.
3.2 Control Totals
If you are an ACH Originator and send files via Direct Transmission or KeyNavigator File Transfer, you may use ACH Direct to enter your control totals online.
**Important Note for Originators**
To ensure smooth processing, log into ACH Direct and input file totals for each ACH Origination file being sent, and then send the corresponding file(s) to Key via Direct Transmission or KeyNavigator File Transfer.
3.3 Entering Control Totals
- From the ACH Direct Main Menu, click Control Totals under the Control Totals section.

- From the Control Totals menu, click Add.

- Choose the appropriate Application Name from the drop down list.

- You are required to complete the following fields. Once all fields are completed click the Save button.
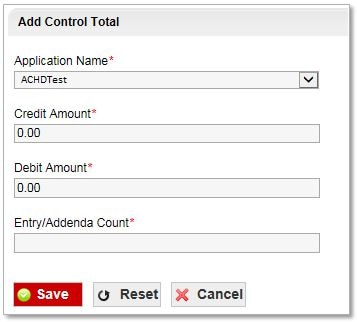
- Credit Amount – Credit amount of file being submitted (include decimal point). i. Enter amounts using a decimal point. For example, if $2,500.00 is the desired amount, enter “2500.00” in the field.
- Debit Amount – Debit amount of file being submitted (including decimal point). i. Enter amounts using a decimal point. For example, if $2,500.00 is the desired amount, enter “2500.00” in the field.
- Entry/Addenda Count – Number of detail records or number of detail and addenda records on the file being submitted.
NOTE: The Entry/Addenda Count can be located within your NACHA formatted file that you send to Key. It is located in positions 14-21 of the File Control (9) Record in your ACH file.
NOTE: It is recommended that you add Control Totals prior to sending your ACH Origination file.
- After the Control Total Add request is processed, the Control Total Add Confirmation will confirm the successful add and provide a Control Total Reference Number.

3.4 Control Total Modification
- From the ACH Direct Main Menu, click Control Totals.
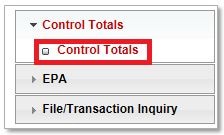
- In order to modify an ACH Direct control total, select the radio button next to the total which requires changing and then click Modify.

NOTE: The Status column displays the status of your ACH file submitted to Key. When the status of the file reads Normal, your ACH origination file has been processed successfully. If the status In Process is displayed, your file has been processed, but with an exception status.
- Make required changes to the Control Total and then click Save.
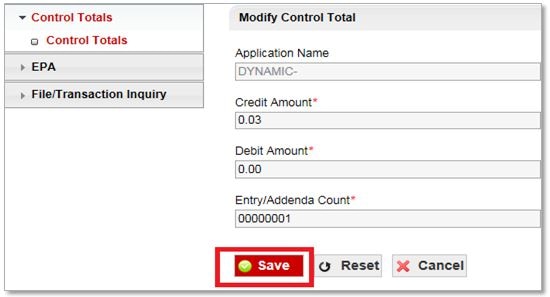
- Once completed, confirmation of the modification will be provided.

3.5 Control Total Deletion
- From the ACH Direct Main Menu, click Control Totals under the Control Totals section.

In order to delete an ACH Direct Control Total, click the radio button next to the total which requires deleting. Click Delete.

- Click OK to confirm the deletion.

- Once completed, confirmation of the deletion will be provided.

A listing of all control totals can be generated using the Generate Report tab. Control totals remain visible for up to three days after file has processed.

4.1 Overview of EPA
Electronic Payment Authorization (EPA), provided via ACH Direct, is comprised of two primary components:
- Event-based email notifications are sent to each designated individual for the account(s) which they are set up for. Some examples of email events are receipt of an authorized transaction, receipt of a transaction without authorization, and actions taken on rejected transactions.
- ACH Direct (accessible through KeyNavigator) enables authorized individuals to decision pending transactions, search and manage existing authorization records, and create new authorization records.
By default, you will be set up so that ACH debits attempting to post to your account are blocked. If there are trading partners who are authorized to debit your account, you may create an authorization online through ACH Direct. This will allow their debits to successfully post to your account without intervention.
Dual Verification for EPA Authorizations and Reject Decisioning is available as an added control to EPA decisioning. It is recommended you have at least six (6) users with access to leverage the use of dual to ensure items can be approved in a timely fashion.
4.2 ACH Direct Email Notifications
Once the EPA service is activated, users will receive event triggered email notifications. Each notification type is assigned a number, making it easy for you to identify the type of notification and any action that may be required. Email notifications can be suppressed per users desired.
4.3 EPA – Authorizations
Authorizations are pre-approved debits from vendors or trade partners your organization has authorized to debit. Establishing authorizations in advance will prevent items from needing decisioning. Authorizations also prevent items authorized from being erroneously returned in the event users failed to take action in a timely fashion.
- From the ACH Direct Main Menu, click EPA, and then click Authorizations.

- Click Add.

- Select the account number for which you will create an authorization.

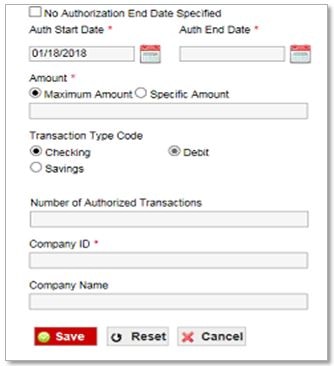
- Enter the required data as described below, then click Save.
- Authorization Date Range
- Begin Date – The date the authorization will become active
- Expiration Date – The date the authorization record will expire or will be considered inactive
- No End Date – If the authorization does not have an end date, check the box that states “No Authorization End Date Specified”.
- Maximum Amount – The maximum amount of the transaction(s) that can be authorized using this authorization record
- Specific Amount – The specific amount of the transaction(s) that can be authorized using this authorization record
- Transaction Type – Checking Debit.
- How many transactions should be accepted with this Authorization?
- Single Use – To authorize only a single transaction, this value should be set to 001.
- Specific Number of Transactions – Enter the specific number of transactions that should be authorized. For example, if the user wants to authorize 10 transactions, this value should be set to 010.
- Unlimited – To indicate that an unlimited number of transactions should be authorized, this value should be left blank.
- Company ID – The Company ID of the transaction Originator
- Company Name – The name of the company originating the transaction.
NOTE: ACH Direct does not support the use of special characters such as &, @, #, etc. in the company name field.
- Authorization Date Range
- Confirmation of the EPA Authorization added successfully will be displayed.

4.4 Changing an Authorization
- From the ACH Direct Main Menu, click EPA. Click on Authorizations.

- To change an authorization, select the radio button next to the desired authorization and click Modify from the Search Results screen.

- Change the fields which must be modified and click Save. When modifying an authorization, you must select the authorization start date to be current date.

- Once completed, confirmation of the modification will be provided.

4.5 Deleting an Authorization
- From the ACH Direct Main Menu, click EPA. Select Authorizations.
- To remove, select the desired authorization using radio button and click Delete.

- Click OK to delete the authorization.
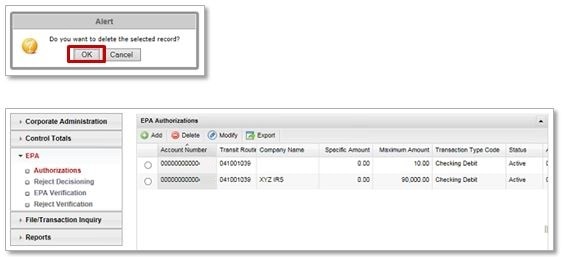
- Once completed, confirmation of the delete will be provided.
4.6 Exporting Authorizations
All authorizations added to ACH Direct can be exported for review. Click on the Export function located to the right of the view icon. File will be downloaded and can be formatted and saved on your organization’s desktops or servers.

4.7 Reject Decisioning
Anytime an email is received advising of a pending entry, you will log into ACH Direct and make a decision to allow the particular transaction to be posted or returned.
There are three options available:
- Accept – Allows entry to post to the intended account on the evening of the indicated return date
- Refuse – Transaction will be returned to the Originator on the evening of the indicated return date.
- Pending – A final decision is not known at this time. You have until 7:00 p.m. ET on the indicated return date to make a decision regarding the transaction. If no decision is made by that time, the transaction will be returned.
Some important tips regarding the decisioning of transactions:
- Decisioning may only be performed until 7:00 p.m. ET on the indicated return date.
- When selecting Accept a user is indicating that the transaction should be posted to the intended account and there will be no further review of authorization records.
- During the acceptance process, users will be given the option to update an existing authorization to ensure future transactions are authorized when received.
- If the detail item is rejected because no authorization record was located, users will be given the option to create an authorization for future transactions from the same Originator. Doing so will prevent future transactions from rejecting.
- If you determine the entry should be returned, select the Refuse option and the item will be returned on the evening of the indicated return date.
Reject Decisioning
- From the ACH Direct Main Menu, click EPA.
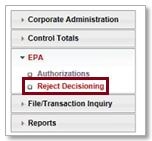
- Click Reject Decisioning under the EPA menu.
- The result will be a listing of the rejected transactions which require action. To refuse or accept a particular reject, click on the radio button next to the desired selection and choose Refuse Selected or Accept Selected.

- Once completed, confirmation of the chosen action will be provided.
NOTE: When accepting a transaction, the message “Would you like to add an authorization for future transactions?” will appear. For instructions on adding an EPA authorization, please see Section 4: EPA Add (Adding an Authorization).

5.1 Overview of Service
You are able to query ACH transactions via the File/Transaction Inquiry functionality in ACH Direct.
The following information may be viewed:
- Originator Browse - Available for Key ACH Originators to view the status of ACH Origination files by set up.
- Account Number – Available for Key ACH Originators and Receivers to view ACH detail by transactional account numbers.
5.2 Locating transaction details
Locating transaction details via Originator Browse
- From the ACH Direct Main Menu, click File/Transaction Inquiry. Click Originator Browse.
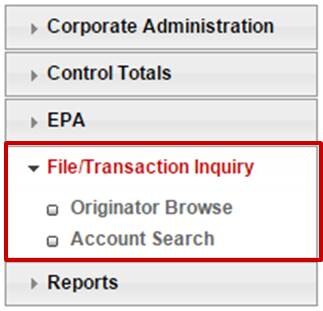
- Select the Application Name desired, date range and/or file status, then click Search.

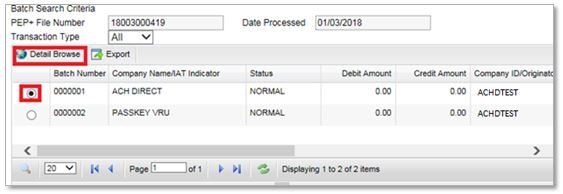
- Search results with file detail will be displayed. In order to browse the batches of a particular file, select the desired file by clicking the radio button, then click the Batch Browse button

- Search results with batch detail will be displayed. To view the specific batch details, select the radio button next to a batch. Click Detail Browse.
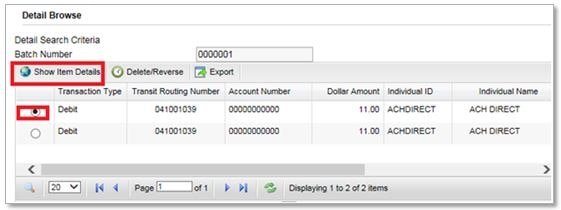
- The result will be a listing of all transactions contained within the batch. To view individual transaction detail, select the radio button next to the desired transaction, and then click Show Item Details.
- The result will be transaction specific details
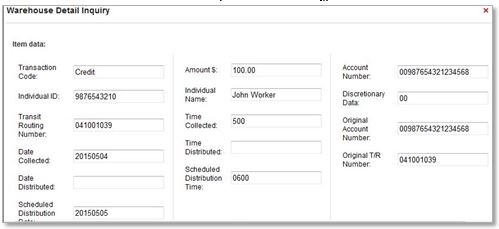
- In order to view any addenda information that may have accompanied the transaction, scroll to the bottom of the Warehouse Detail Inquiry view and click Show Addenda.

- The result will be any addenda information which was transmitted with the transaction.

- In order to view any addenda information that may have accompanied the transaction, scroll to the bottom of the Warehouse Detail Inquiry view and click Show Addenda.
Locating item details via Originator Search by Account Number
- From the ACH Direct Main Menu, click File/Transaction Inquiry. Click Account Search.
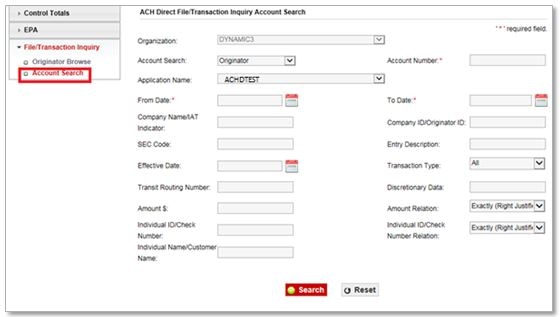
- The result will be the Account Search screen.
- The following fields are required:
- Account Search – Originator must be displayed
- Account Number – Type in the relevant account number to be searched
- From Date – Select a desired beginning date for the search period
- To Date – Select a desired end date for the search period.
- Enter any remaining desired search criteria, and then click Search.
- The following fields are required:
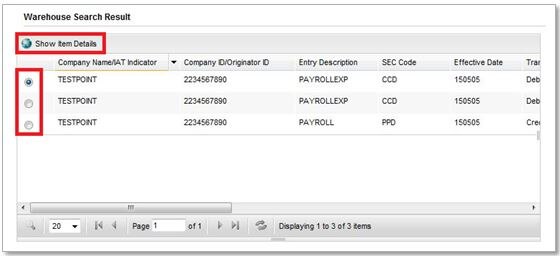
- The result will be the Warehouse Search Result screen, populated with each transaction meeting the search criteria. For additional detail on a particular transaction click the radio button next to the transaction, and then click Show Item Details.
- The result will be transaction specific details.
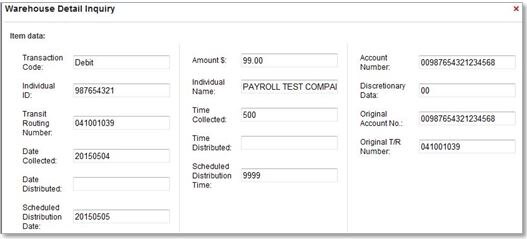
- In order to view any addenda information that may have accompanied the transaction, scroll to the bottom of the Warehouse Detail Inquiry view and click Show Addenda.

- The result will be any addenda information which was transmitted with the transaction.

- In order to view any addenda information that may have accompanied the transaction, scroll to the bottom of the Warehouse Detail Inquiry view and click Show Addenda.
Locating transaction details via Receiver Search by Account Number
- From the ACH Direct Main Menu, click File/Transaction Inquiry. Click Account Search.
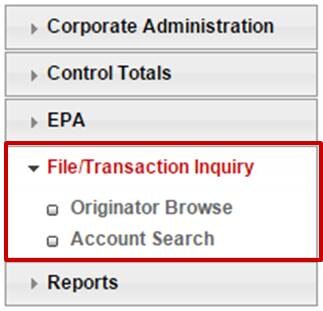
- The result will be the Account Search screen.
- The following fields are required:
- Account Search – Receiver must be displayed.
- Account Number – Select the relevant account number from the drop down box to be searched
- From Date – Select a desired beginning date for the search period
- To Date – Select a desired end date for the search period
- Enter any remaining desired search criteria then click Search.
NOTE: The Search timeframe is limited to no more than ten (10) days.
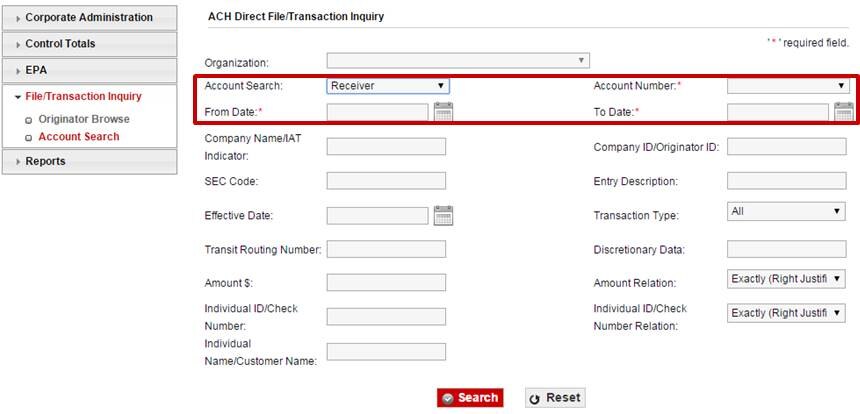
- The following fields are required:
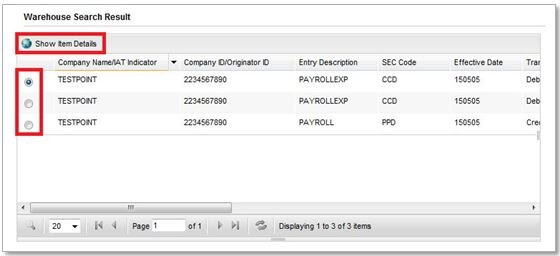
- The result will be the Warehouse Search Result screen populated with each transaction meeting the search criteria. For additional detail on a particular transaction, click the radio button next to the transaction. Then click Show Item Details.
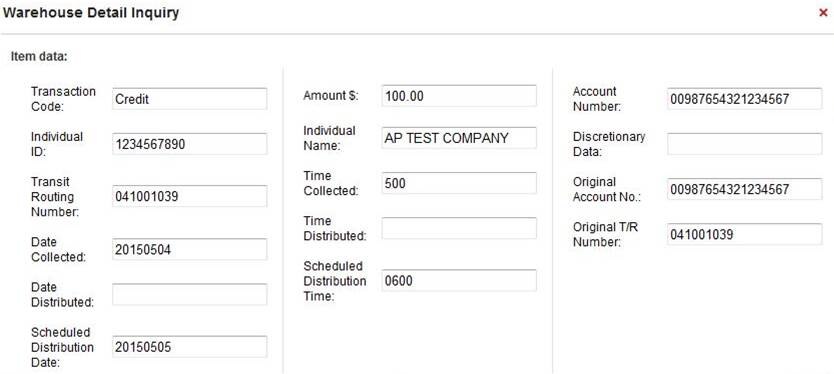
- The result will be the transaction specific detail.
- In the event a received transaction contains addenda information, scroll to the bottom of the Warehouse Detail Inquiry view and click Show Addenda to view.

- The result will be any addenda information which was received with the transaction.

Locating Trace ID(s)
- Transaction details contain two key fields for determining a Trace ID. A trace id is comprised of:
- The first 8 digits of the Transit Routing Number
- The last 7 digits of the PAR#

- To locate multiple trace ids more efficiently, you can export your search results into a .csv file for more efficiency. Using originator browse outlined in section 5.2, click export on the search results window.

- Once downloaded, you can open the .csv file to locate the transit routing number and PAR# to construct the transaction trace id.

Through the warehouse feature, any item originated by your organization can be requested to be reversed or deleted.
- Reversals are permitted within 5 banking days of the original effective date.
- Delete requests can only be submitted if the original item has not been released into the network.
- Reversal requests are performed once item has been located through the ACH Direct File/Transaction Inquiry Search
- Only Items are permitted to be requested for deletion or reversal. Batch and File requests should be submitted directly to ACH Operations.
5.3 Performing a delete/reversal via Originator Browse
- Select the applicable date range for your file search and click search. Within the search results, select the file containing the transaction(s) you wish to reverse and click batch browse.

- Within batch browse, select the batch containing the transaction(s) you wish to reverse and click detail browse.

- Within the detail browse, select the transaction that you wish to reverse and click Delete/Reverse. At the following prompt, click Yes.

- Once you’ve committed the delete/reversal, you can view the status of the item by scrolling to the left of the detail browse window and looking under Deletes/Reversals Status. After committing the status will read pending, and once the action takes place in the ACH network, the status will change to either deleted or reversed.


5.4 Performing a delete/reversal via Account Search
- Within Account Search, designate whether the transaction was originated or received, and input the account number and date range for the transaction that you intend to delete/reverse. You can also input the amount of the transaction to further refine the search. Once complete, click the search button.

- Select the transaction that you wish to delete/reverse and click the Delete/Reverse button. After committing, the status will show as pending. Once the actual delete/reversal takes effect in the ACH system, the status will change to deleted or reversed.
In order to better understand EPA Dual Authorization, you must first understand ACH Direct EPA.
6.1 Overview of EPA Dual Authorization
Segregation of duties and additional operational controls are becoming increasingly important due the changing security climate surrounding electronic transactions. This changing climate places pressure on organizations to ensure that effective controls are in place and are being utilized through sound business practices.
ACH Direct offers Multiple-Level Authorizations for you to enhance your controls around preauthorization and approval of incoming debits presented against the corporate account.
Automated solutions, such as dual verification, provide multi-level controls to enhance security and risk management for ACH Direct users. This solution offers the ability to mitigate fraud and tracking tools to document these controls.
Required authorization is customizable. The need for secondary approvals can vary by transaction amount and/or individual user in accordance with internal Corporate Security and Risk requirements.
6.2 ACH Direct Email Notifications
Once the EPA Dual Authorization service is activated, you will receive event triggered email notifications. Each notification type is assigned a number, making it easy for you to identify the type of notification and any action that may be required.
Email notifications can be added or removed for a user by the Corporate Administrator for your organization, or you may contact your Treasury Service Payments Advisor to request adding or removing of email notifications.
6.3 How ACH Direct Dual Authorization Works
When authorizations are added, modified or deleted in ACH Direct and reject decisions are performed by one user, they are sent to a work queue to be approved by another user. ACH Direct Dual Authorizations offers two types of parameters that can be established for each associate:
Associate Level
- Level 1 – Can add, modify or delete authorizations and decision pending rejects; cannot approve those actions taken by others
- Level 2 – Can perform the actions of Level 1 and also can approve the actions taken by others (either Level 1 or Level 2 associates).
EPA Maximum Dollar Limit
The EPA Max Dollar Amount defined for an associate is the maximum transaction amount not requiring secondary approval for authorizations added, deleted or modified and for reject decisioning actions. Secondary approval action does not take into account the user’s EPA Maximum Dollar Limit.
6.4 How to Navigate through all sections under EPA
Under EPA, the following options are listed if you are an authorized user for EPA with Dual Authorization:
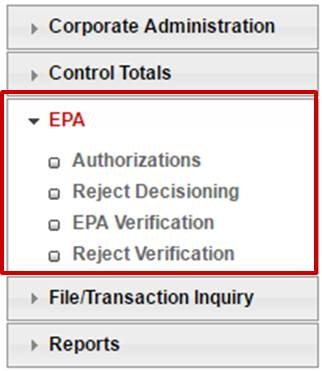
- Authorization – View, modify, delete and add authorizations (also known as filters) for pre-authorized debits. The status of the authorization is displayed, such as active or revoked. If a new authorization is created or an existing one is modified and it exceed the user’s maximum authorized amount; it will automatically move to the EPA verification queue for secondary approval.

- Reject Decisioning – List of all rejected transactions which require action (pending, refuse or accept). No action will result in the debit being returned unpaid. Once an item is accepted, when dual authorization is enabled, it will move to reject verification for secondary approval if the item exceeds established limits.

- EPA Verification – This tab will display all added, changed or deleted authorizations (filters) requiring secondary approval. A designated approver level 2 associate will take action here. User will select the item using the radio button and then either approve or deny the transaction.

- Reject Verification – Decisioned pending rejects requiring dual approval will be displayed here for approval by a designated level 2 associate. User will select the item using the radio button and then either approve or deny the transaction.

When enabling dual authorization, it is important to ensure the correct numbers of users are set-up to ensure coverage when assigned users are out of the office.
Consider critical holidays and times throughout the year where many users may not be available. Failure to appropriately plan in advance could result in an item being returned if dual approval did not occur in a timely fashion.
NOTE: On the initial set-up, all users will be set up as a Level 2 approver with $0.00 maximum authorization amount. These default settings will allow every user to perform secondary approvals, but will also require secondary approval for every action.
If you have any questions regarding ACH Direct, please contact your Payment Advisor or 800-821-2829.
